PLUSH BY MAKESHIFTWINGS
  • Home
  • Portfolio
  • FAQ
  • Guides
    • Tutorials
    • Mochi minky
    • Sublimation
    • Plush Making Resources
  • About
    • The Artist
    • The Mascot
  • Contact
  • Shop
  • Patreon

Sublimation Guide

Sublimation is the process of printing a design with dye and then transferring it to your medium via heat press. You can use this process on polyester fabrics in place of traditional methods of creating designs on plushies like embroidery, applique, etc.

The set-up costs are expensive, but it can save you time in the long-run and allow you to achieve details that are not possible with traditional methods.
​
Since you are printing a design created on a computer, you can make it as detailed as you'd like including gradients, excessive details, and more! It also completely preserves the softness and texture of the minky, unlike embroidery or airbrushing.

Sublimation only works on polyesters. For minky, it works best on low-pile types like mochi or 1.5mm smooth minky. 3mm also works but you may see the base color underneath the color on top.


​
​
Quick Links:
​
Equipment
ICC Profiles
My favorite sublimation settings for minky
Notes on sublimating minky
Time & temperature trial and error guide
Process Walkthrough
Sublimation on faux fur
Tips & Tricks
Sublimation Made Simple Facebook Group
Picture
Picture
 

Sublimation Equipment

 
For the most part, I followed this guide on Youtube for what to purchase and how to set it up. You can find my thoughts on each piece of equipment below.

Overall, my beginning setup cost me around $400.
​

​Printer

You can, of course, buy a printer specifically made for sublimation but these will be much more expensive.

The alternative is to buy a printer made for NORMAL printing and convert it to a sublimation printer (which is a fancy way of saying that you need to fill it with sublimation ink instead of printer ink).

You must buy a NEW printer and to fill it with sublimation ink instead of printer ink. The easiest brand to do this with is the Epson Ecotank series. Some people say you can buy it used and try to change it afterward, but this often fails, so it's better to save up and buy a new one.

There are many different models of Ecotanks. I bought the Epson Ecotank 2803 on sale during Black Friday from Walmart. It only does up to the traditional 8.5" wide paper. You can buy models that print larger, but it will be more expensive.

It's worth noting that you void any warranty by filling a printer with sublimation ink, so you can't get your money back if something breaks.

Picture
Picture
​
Heat Press

​You must buy a heat press for sublimation. You cannot use an iron because you need to be able to control the temperature to exact degrees and you need to press a large area.  Heat presses will also set a timer for you and the larger shirt presses can adjust pressure settings.

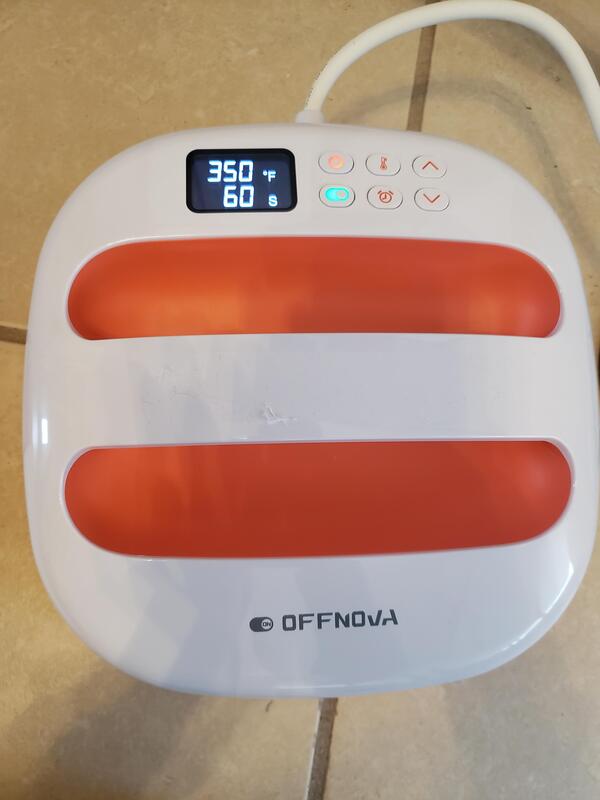
I originally bought a Cricut Easy Press 2 but it broke on my 2nd day owning it. It gave me 3 different errors related to overheating and not being able to maintain a consistent temperature, and would shut off automatically. I returned it and bought an OFFNOVA instead (top left).

The smaller easy presses are convenient, but somewhat impractical for larger designs. If you have a design larger than your press you will need to break it up into multiple prints and apply them one by one. It's very difficult to press a single design twice without ending up with a line, even if your design doesn't have one (see pic to the right).

Picture
The best press is a large shirt press, which is easier to use, but they are more expensive and take up a lot of space. I went about 8 months before I bought Princess Presscilla Pancake, which is my Hix Presto 20 heat press pictured in the top right of this section. It can do a 16"x20" area. I bought her secondhand on Craig's List for $130. While it works great, it's an older model, so the temperature is set by a dial instead of a computer. It also does not have a built-in timer. I decided to buy it because it was such a good deal for a large working press. New heat presses that do about a 15"x15" area are around $170-$300++ on Amazon. If you are comfortable taking the risk of buying a secondhand press I would recommend it. I found lots of them on both Craig's List and Facebook Marketplace. I think a lot of people buy these presses to start a t-shirt business and quickly decide they don't want to do it anymore!

Since PPP is so big, I bought a cart to put her on so I can easily store her in a closet when she's not being used. The cart also has a couple storage shelves which are really handy for storing my other sublimation supplies.


Sublimation Ink
​
I bought Hiipoo sublimation ink on Amazon. This ink will come with syringes to fill your printer with.

There are many different brands with Hiipoo, Cosmos Ink, and Printers Jack being some of the most common. Once you get a custom ICC profile set up they all perform just about the same.

You are not supposed to mix brands of ink, as every brand will be slightly different. Once you pick a brand it's recommended that you commit to it, as otherwise you will need to completely drain and clean your printer out of the previous brand of ink.

​
Sublimation Paper

I also bought Hiipoo sublimation paper in the standard 8.5"x11" size because it was on sale. I wish the wrong side of the paper was easier to differentiate; it's just a light pink color. You print on the bright white side.

You can mix and match brands of sublimation paper. There is also 8.5"x14" sublimation paper for longer designs, but make sure your heat press is large enough to handle it.

​
Protective paper

You need to buy protective paper to put between the heat mat and your minky and the minky and the heat press. You can use specific protective paper for sublimation but you can also use butcher paper, which is what I bought.

​
Heat Resistant Tape

I bought this tape on Amazon. So far, I'm not a fan. While it holds everything in place well, it's an awkward size so it doesn't fit in my tape dispensers, and then it doesn't tear by hand well so you have to use scissors.

Heat tape leaves marks on the minky where you attach it. So you need to be very specific about your placement (or, tape it to the back of the minky, or to the butcher paper and then the butcher paper to your backing sheet of butcher paper or heat mat).


PPE

The science behind sublimation actually involves the dye turning into a gas before adhering to the fabric, so it's recommended that you wear a mask and work in a well-ventilated area. The heat tape particularly doesn't smell good either!


Heat Press Mat

If you use an easy press you will need to have a heat press mat. I bought this one on Amazon. It needs to be big enough for your heat press to be covered entirely.
 

ICC (International Color Consortium) Profiles

 
What is an ICC profile?
An ICC profile is basically a mapping between the colors you see on your monitor and the colors that actually come out of your printer. Since the normal ICC profile for your printer is calibrated to normal printer ink, to get the best results, you need to set up a custom ICC profile in your image editing program.

Ideally the ICC will match your exact combination of printer, sublimation ink brand, and sublimation paper. Your ink brand may have these ICC profiles on their website, but it may not match your combination. But it should be better than not changing your ICC profile at all. Your ICC profile does NOT have to match your exact type of ink, but the ICC profile will be specifically made for that combination.

Setting up an ICC profile is OPTIONAL. You may find that you need to make manual adjustments in your image editing program to get the right colors, or you may find that your printer's colors are just fine. I also hear that Cosmos Ink matches default ICCs the best, so that's another consideration when choosing your ink brand.

However, using ICC profiles really does make a big difference. Below I share my testing method.

​
Where can I get an ICC profile for my setup?
You need to hope one exists for your exact combination. If you haven't bought materials and equipment yet, consider matching your setup to an available ICC profile.

Here are some links with ICC profiles I'm aware of:
  • HIIPOO Ink
    • Limited Epson Ecotank printers (2720, 2760, 3760, 16650, and 4700)
  • InkOwl Performance-D Sublimation Ink
  • InkPot Sublimation Ink for EPSON Desktop Printers
  • Printer's Jack ink

​
How do I install an ICC profile?
You can follow this guide on how to install it in Photoshop. You can follow this guide for GIMP.

Note that on a couple of the HIIPOO ICC profiles linked above I had to remove the second ".icc" from the file name to get mine to work.
​

Testing ICC Profiles

This handy image below can help you test your ICC profiles. I found it in the Heat Press discord. Ideally what you press on white fabric will come out looking exactly like the colors of this image on your monitor with a precise amount of detail. You can also resize this image to save on materials.

Picture

Using the image above I tested the 5 HIIPOO ICC profiles found in this Google Drive link, GIMP's default color correction with 2 different coloring intents, and also the InkOwl and InkPot ICCs for my printer Most of these were using the normal relative colorimetric coloring intent except for the 1 GIMP test using perceptual.

​I pressed these at 350F for 60 seconds on #90 white mochi from Hopen Textiles. I have an Epson ET-2803 printer, HIIPOO ink, and A-Sub paper.
​
Picture
 Honestly the default color profiles and color management from GIMP were pretty good. The two problems were the reds coming out a bit too orange and there is some detail lost in the black lines & circles. The perceptual resulted in slightly brighter colors than the normal Relative colorimetric coloring intent. (Note "default profile" labeled one is Relative colorimetric)
Picture
Picture


​ET-2760 was one of the better ones as well. The red was pretty bright and less orange than the others, but still had a bit of an orange undertone. The details showed up well. However, my biggest issue was that the blacks look brown.
Picture

​


​The colors on the ET-2720, 4700, and 16650 profiles were awful. The colors are very dark on the first two and practically all colors are lost on the last one. However the detailed lines were super clear on all of them.
Picture
Picture
Picture


​ET-3760 was the last one I printed, and I realized that it creates a pink film over all the white areas, and I didn't realize it until after I printed it - so it ruined my entire sheet of tests!!! I liked most of the colors except the light blue which was just converted to a dark blue instead.
Picture
The InkOwl and InkPot ICC profiles for my 2803 was the same story; really dark colors but the details were well-defined. So mixing ink brands ICCs for my HIIPOO ink will not work but it was worth a try.
Picture
Until an ICC profile is developed for my combination I will probably bounce between the ET-2760 ICC profile and using the default profile in GIMP with perceptual coloring intent, depending on if I need to sublimate black or not.

​So which ICC profile should you use? Honestly, you need to do some tests. Unless you have the exact same setup as me, what works for me will not necessarily work for you. I recommend printing out some samples of the image I linked above and printing it out under different ICC profiles to see what looks best.
 

My favorite sublimation settings for minky

I've tested sublimation on minky for countless hours. Below is my TL;DR version of my favorite sublimation settings for minky. If you'd like to read detailed notes on how I landed on these settings you can read the next few sections. Of course, your experience and results may vary from mine.
​
  1. Printer settings
    1. See image
  2. Temperature
    1. 325C for designs that need crisper edges like faces
    2. 375C for designs that do not need crisp edges or for sublimating large blocks of color (i.e., you're making a new color minky)
  3. Time
    1. 5 minutes
  4. Pressure
    1. Lightest pressure that produces results on your heat press
Picture
 

Notes on Sublimating Minky

 
As we all know, minky has a pile or fur-like texture to it. The standard is 3mm. However, longer pile minky does not work as well with sublimation because you can frequently see the base color of the minky when the pile is brushed up or along seam lines. This is one of the most common complaints about Spoonflower's minky.
Picture
While Spoonflower uses a lower pile of minky, you can still see the white base underneath the design printed on top.
Picture
You can see the white poking through on the seams of the ears and tail.
It's ideal to use a shorter pile minky like 1.5mm, or mochi minky, which also has a short pile. Hopen Textiles sells both 1.5mm minky and mochi minky. Shannon does have 2mm minky designed for printing but unfortunately it's only available via a wholesale account with them at the moment.


You can of course use 3mm minky, as it's what most of us use and likely what you are trying to match to your plush. But depending on your settings, you may see the base color underneath the print on top, just like Spoonflower minky. However if you use my favorite sublimation settings discussed above, you can get similar results to mine shown in the above video. This is 3mm Shannon minky! Just remember that the lower your heat and shorter your press the more base color you will see.

So that begs the question - can you sublimate onto non-white minky?

Yes! You can use any light colored minky, or even some medium colors, but nothing dark. Any dark colors will not show the design on top unless your design is even darker (and white sublimation ink does not exist). If you apply a design to a non-white minky, though, you may have to adjust the colors of your design (different from ICC profiles). By using a base color minky that is similar in color scheme to your design, it can help cut down on the unattractiveness of seeing the base color underneath the print.

However, you need to keep in mind your design. Again, white sublimation ink does not exist. If you have white in your design, there is no ink printed onto the paper in that area. So if you have a part of your design that is white or lighter than your base color, you need to apply the design to white minky and dye the rest of it the color you want. Otherwise the base color of minky will show up where the white area of your design is.
Picture
Sublimation on cream colored mochi
Picture
Sublimation on light brown mochi. You can see how the "white" sprinkles just show the mochi color instead.
 

Temperature & Time Trial and Error on Mochi Minky

 
To apply your design to your minky you need to press it for a certain amount of time at a certain temperature set on your heat press. But what temperature should you use, and for how long? Well, that's the magic question. Because minky can melt under excessive heat, you don't want to use a very high temperature and you also don't want to hold the heat press on for too long.

Your sublimation paper should come with recommendations but they are pretty generic. When I first got my sublimation setup I did a scientific method of trying different temperatures and times to sublimate the face of one of my sugar cookie dittos on cream colored mochi minky.
Picture

​By far the worst result was 350°F for 40 seconds. The design was not completely transferred and was dull. Once I got beyond 350°F for 60 seconds the differences became less and less obvious. Here is a comparison between 350°F for 40 seconds and 350°F for 70 seconds which is the longest I held the heat press on any temperature.
​
Picture
The difference between 350°F and 375°F for 70 seconds was barely noticeable. If anything, 375°F was a bit more crisp, but started to develop a subtle shine at certain angles.
Picture
Picture
375°F at 70 sec
What about the base color showing underneath the print?

It's noticeable when brushing the design up or stretching it out since I'm sublimating a dark design onto light fabric. The 375°F was a bit better than the 350​°F but again, not much of a difference.
Picture
At 400°F the shine started to become more obvious without any noticeable difference in clarity of the design or the dye sinking in further to the base.
Picture
Picture
400°F for 40 seconds
Picture
I did not find a difference in whether I pressed down as hard as I could (if anything, this was risky because the heat press could slide). I also did not find a difference if I brushed the pile "up" before using the heat press (it would just push it back down). 

Here is a test I did on light brown mochi minky, also from Hopen. The base color is much harder to see, likely because of the colors used, but also because this mochi seems to be a little 'denser' than the mochi used for the sugar cookies.
Picture
Picture
So, is there any way to get the dye deeper into the fibers? Yes, but there is give and take. First of all, anything around 3mm is generally always going to show the base color more than shorter piles like 1mm or 1.5mm.

MyLittleWaifu discovered that you can leave a heat press on for a very long time and get the dye deeper into the fibers. We're talking 5-6 minutes at 350F-360F! I was afraid to do this when I was starting out because of burning the minky, which I think is still a risk depending on the exact minky type you're using.

Here is what I discovered when I tried it out:
The top strip is from a 60 second press at 350F. While the dye was decent at covering most of the fibers, the buckskin base still showed a bit when folded.

The bottom strip are the same colors pressed for 6 minutes at 360F. However, the dye got much deeper into the fibers, showing significantly less of the buckskin base.

But, you can see how much lighter the colors got from pressing for a much longer time! Also, the numbers are much blurrier compared to the top (makes sense if the dye is getting deeper into the fibers).
Picture
So, you can press for much longer times than the general minute or so, but:
  • ​YOU NEED TO WEAR PPE, it smells really bad when you do this for this long!
  • It will get deeper into the fibers but:
    • The color will get lighter than shorter presses, so you need to compensate for this
    • You will lose definition in any fine lines/designs
  • You can't apply your timer on an easy press since it only allows short times so you need to time it separately
  • You run the risk of burning minky (I didn't notice it on mine but it's definitely a risk)
Pressing for long times is better when you're just trying to get a solid color without any designs. In this case I was trying to get a mochi color very similar to pumpkin from Shannon. So I did not need any clear lines, details, etc. just a solid block of color.

Overall I'd recommend either 350°F for 60-70 seconds or 375°F for 40-60 seconds for intricate designs. If you're just trying to make a block of color, try a longer press, starting at 350°F for 5 minutes (please read my caveats above).

​You should absolutely do tests with your own minky, designs, and equipment as everyone's experience will vary!
Picture
Picture
 

Pressure Trial & Error

Picture
Stronger pressure produces crisper lines but the minky becomes less soft. A lighter pressure keeps the minky extremely soft but the design becomes less defined.

​Once I got Princess Presscilla Pancake a new factor entered the mix: pressure.

It's too hard to regulate pressure on an easy press. But with a t-shirt press there is a pressure gauge built into the machine. It's a dial you rotate in the back of the machine. Unfortunately, mine has no gauge of what the pressure actually is - maybe others do, but I didn't see any type of indicator on mine.


The pressure on PPP was very strong when I first got her. You can see in the snippet above that I had to push to get her to "lock". I was doing long presses to get the dye deep into the fibers of mochi minky. While the colors were beautiful and crisp, one thing that was bothering me about the result was that the minky was a lot less soft after sublimation. It reminded me of Spoonflower minky where it was rough when you ran your fingers against the pile. I didn't have this issue when doing long presses with my old easy press.
After wasting a bunch of fabric and time I eventually realized that the difference was pressure. When doing long presses with my easy press I would set the press on top and leave it for 5-6 minutes. So the only "pressure" was the weight of the easy press. On PPP I was applying a LOT of pressure to the fabric. So I loosened the pressure dial significantly.

My first test did not transfer any dye at all. After a couple more tests of applying slightly more pressure, the dye was transferring successfully and getting very deep into the fibers. You can see that I no longer have to press hard to close the machine. What I decided was that I liked 325°F for 5 minutes for designs that I needed a crisper look for, like Shifty's face. The dye is still deep in the fibers but not as deep for higher temperatures. I liked 375°F for 5 minutes for when I wanted the dye to sink all the way into the fibers and didn't mind that the edges were fuzzy. I think it gives the plush a beautiful vintage look!
Picture

Sublimation Walkthrough

Below is my own method of doing sublimation on minky. Everyone's technique is bound to be a little different; so here's what works for me!
​
Picture
1. Create your design
  1. I use GIMP and Inkscape, which are free programs. Any image editing software will work.
  2. I either freehand the design to scale or first scan in my pattern then draw on top of the pattern
  3. If  you are doing a design that runs to a seam, it's best to extend the color into the seam allowance (and possibly even a bit beyond, depending on how you plan to cut it out) to allow for some wiggle room
  4. If your patterns INCLUDE seam allowance, you can consider tracing the seam allowance line on your design to help you line up your sublimation paper
    1. This will help you line everything up
Picture
2. Print a test
  1. ​ I like to print a small set of squares with each main color in my design to make sure the colors are correct. This is also helpful if you're trying to achieve a certain color on an off-white minky like I am in this example.
    1. You can number them in your image to make sure you're keeping track of which is which.
    2. You can apply it to fabric scraps to not waste any fabric.
    3. If you are confident in your ICC profile and applying it to white minky, this step isn't necessary.
    4. Alternatively, check out the color guide image you can print in the tips & tricks below
  2. Make sure you have your custom ICC profile set up before printing, as discussed above
  3. Make sure your settings for your Ecotank are correct
    1. Correct size paper
    2. Matte paper
    3. Best quality
    4. Mirrors your design before printing (the image will flip when applying it to the fabric)
  4. Your print will be darker/more subdued than you intend. This is supposed to happen.
  5. The true colors will come out after you press the design.
  6. I cut smaller designs out as I find it easier to work with
    1. Leave some area around the design for taping​
    2. The edges of your sublimation paper can leave lines from your heat press. You can also rip the paper instead of cutting it for a softer line
​(On my printer, I get messages before I print because it doesn't like sublimation paper. You just have to press through a couple prompts before it will print.)
Picture
Picture
Picture
3. Warm up your heat press
  1. As discussed in the trial and error section above, I recommend between 350°F for 60-70 seconds or 375°F for 40-60 seconds for intricate designs that you do not worry about the base color showing underneath, and between 325°F-375°F for 5 minutes if you're trying to sink the design deeper into the fibers. Figuring out the right temperature can be part of your test. If you're using a t-shirt press I recommend light pressure to preserve the softness of the minky, but it will result in your design becoming fuzzy around the edges. If you want a crisper look, increase the pressure.
4. Prepare your minky
  1. Some brands of minky or mochi may curl/warp during the pressing process. I've noticed that JoAnn's pure plush fleece tends to shrink. So, you can either try pre-washing and drying your fabric on a medium or low heat, or you can pre-press your fabric with your heat press. I do it for 30 seconds at a lower temperature like 250°F-300°F or just while it's heating up. 
    1. This is another good reason to cut out a piece of minky larger than your pattern so you can cut this away (see next step)
  2. Just like you would with embroidery, if possible, it's better to cut out a larger piece of minky than needed and then cut it down to your pattern size after the sublimation is applied
  3. I like to iron my minky with a normal iron to remove any wrinkles
  4. Iron from the back on a low heat setting
    1. If necessary, also iron the front for extra-stubborn wrinkles
  5. Lint roll it to remove any loose fibers
    1. If any get between your sublimation paper and minky, it will leave gaps in the design
5. Prepare protective paper
  1. Cut butcher paper large enough to cover the whole cut of minky from the heat press
  2. You need 2 pieces: 
    1. One that goes between your heat mat and minky
    2. One that goes between your minky and heat press
  3. You can reuse your protective paper as long as it's in good condition!
Picture
6. Tape the sublimation paper in place 
  1. You need to tape the sublimation paper to prevent it from shifting while pressing.
  2. You MUST use heat-resistant tape.
  3. My heat resistant tape leaves marks on minky, so I try to avoid placing the tape on the minky unless I'm certain that part will be cut away. (It doesn't matter on a test piece, which is shown above). You can either:
    1. Tape along the edges of the minky if it will be cut away later
    2. Tape from the back of the minky onto the sublimation paper, if your paper is big enough
    3. Tape the sublimation paper to the top layer of butcher paper; and then tape the two pieces of butcher paper together
Picture
7. Press the design
  1. Cover your minky & sublimation paper with another piece of butcher paper.
    1. Your sublimation paper should be on top of the minky
    2. order: heat press -> butcher paper -> minky -> butcher paper -> heat mat
  2. Place your sandwiched minky and sublimation paper on your heat mat. The part being pressed needs to be completely on your heat mat.
  3. If using an easy press:
    1. CAREFULLY place your heat press on the top piece of butcher paper, DO NOT LET IT SLIDE AT ALL.
      1. I find it better to let gravity do most of the work here while setting it down, and THEN press down harder.
      2. If I try to push hard right off the bat, the easy press will slide on the butcher paper and cause a really strange "after image" effect on your sublimation.
    2. Press the button on your press to start the timer
    3. Apply even pressure throughout
      1. I apply "medium" pressure (press down, but don't apply all of your weight)
    4. When the timer is done, LIFT STRAIGHT UP, do not let it slide
  4. If using a t-shirt press:
    1. Close the heat press "with purpose" so the contents don't shift within
    2. Start the timer
    3. Lift up cleanly when complete
8. Let the minky cool
  1. The setting will be instant, but it will still be hot.
  2. Once it's cool to the touch, you can remove all the paper and tape.
Picture
9. Make adjustments as needed
  1. Evaluate the colors and overall design
  2. Adjust colors, temperature, time, and pressure if needed
10. Do another test or repeat process with your final design
11. Remove heat marks as necessary
  1. Sometimes, you will get heat marks from your press. Polyester has a "memory" and in combination with how the minky is affected by heat, this seems to be unavoidable
  2. I've had some success with spraying the minky with vinegar and pressing it with a protective cover after (you can use a clean pillow case) after. You can also spray a white cloth with vinegar and press this to the minky. It seems to help remove some of the marks. (See tips and tricks section for more detail)
  3. You will need to wash the fabric and presses when you're done to remove the vinegar smell. Your sublimation will not be affected.
​12. Done!

Below is a sped-up video showing the process of pressing a sublimation design onto mochi minky.
 

Sublimation on Faux Fur

You can even do sublimation on faux fur! But it has several limitations:
  • You need to do low temperatures because it melts easily. This will limit the colors you are able to achieve
    • I do 300F for 60 seconds
  • You have to brush out the fur after you sublimate, so you cannot do designs
    • Any designs will become separated after brushing
  • The dye will only apply to the top of the fibers, creating a toned/tipped effect
    • You cannot get the dye underneath the top or to the base
 

Tips & Tricks

Is there anything you wish you knew when you started?
​​
  • Knowledge that you cannot make continuous designs larger than your heat press without obvious lines from where you press a 2nd time
    • Get the larger t-shirt style heat press if you can afford it and have room
      • You can buy one secondhand if you're comfortable taking the risk
  • Pick an ink brand that has good ICC profile support
    • You cannot switch ink brands once you have put it inside your printer!
  • Alternatively, pick a printer and ink brand which already has an ICC profile

​
How can I line up my design with my pattern?
In short, treat it as you would with embroidery or applique.

Cut out a piece of fabric larger than your pattern piece + seam allowance. I usually add at least a 0.25" margin depending on how large my pattern piece is. It's easier to cut it larger, apply the design, then cut it smaller than to start with the fabric exactly the size it's supposed to be.

In your sublimation design, you can outline the edge of your pattern or seam allowance line. This is the black line on my sublimation paper. Then cut around this line.

Because the line is on your seam allowance, it will not show up on your plush.
Picture
Align your sublimation paper with your pattern, and lay the pattern onto the minky, making sure your sublimation paper is facing DOWN (dye against the minky; you should see the wrong side of your sub paper).

Tape it into place with your heat resistant tape. The pattern will still be underneath and this is fine. You want to make sure things aren't shifting beyond your extra wiggle room that you cut out.
Picture
Slip the pattern out from underneath your sub paper. Now you can press your design as normal!
Picture
When you're done you can realign your pattern piece with the line you drew and trace the rest of your pattern onto your fabric, if necessary. Then cut out and you're done!

You can watch this process in the sublimation process video linked above.
Picture
Picture
Picture
I'm getting marks where the edges of my heat press and/or sublimation paper was. How can I remove them?
This is one of the downsides to sublimation; polyesters, and especially minky, have a "memory" and applying excessive heat for long periods of time can leave marks on the fabric.

You can get these marks from the heat press, tape, and even the heat press. The larger your heat press, the better, as your pattern is likely to be smaller than your heat press. But I use the small easy press which means if my pattern is larger than the 9"x9" heat press or my sublimation paper, I'm going to see the mark.

It's less noticeable on white or light colored fabrics but on this light brown I was sublimating it was more noticeable.

I tried protecting the fabric that wasn't being sublimated with pillow cases, fabric, etc. to provide extra layers between the fabric and press, but the edges of these items just left extra heat press marks on the fabric.
​
​I had some success with using vinegar to help remove some of these marks. (This probably explains why when I've ordered custom shirts from some sites like Redbubble in the past, they arrive smelling like vinegar!)
Picture
There was no perfect step-by-step process for this; I used a combination of:
  • Using a spray bottle filled with distilled white vinegar to wet the minky where the heat mark was, covering it with a white cloth, towel, or pillow case, and pressing it with my iron with steam
  • Wetting a press with vinegar and pressing it with an iron with steam
  • Spraying the fabric with vinegar and using a comb to brush the nap in different directions and then press with steam
After you're done, you must wash your fabric to remove the vinegar smell. I washed my minky on a quick wash on tap cold. Then I put it in my dryer for 30 minutes on low heat.
Picture
Picture
Below is the same piece before and after treatment. It's still there, but it's much less prominent. Once you get the plush sewn together and stuffed the line will not be noticeable.
Picture
My fabric is curling/warping/shrinking when I press it! What do I do?

​Some brands of minky or mochi may curl/warp during the pressing process. I've noticed that JoAnn's pure plush fleece tends to shrink. So, you can either try pre-washing and drying your fabric on a medium or low heat, or you can pre-press your fabric with your heat press. I do it for 30 seconds at a lower temperature like 250°F-300°F. 
I can see the base color underneath my design! Is there any way to prevent this?

​This is hard to prevent for longer pile minky around the 3mm range. But, check out the later part of my Time & temperature trial and error guide section. For shorter piles like 1mm or 1.5mm, if you press for a VERY long time, like 5 minutes, you can get the design deeper into the fibers. BUT, you will lose definition, your colors will change significantly, you run the risk of burning minky, and it SMELLS.
My design is moving/duplicating/ghosting when I press it!

You can see "ghosting" in the dittos below where the black parts of the designs are duplicated in a separate area, leaving a strange after-effect. This is caused by the sublimation paper, fabric, and/or heat press shifting when it's pressed. You can prevent this by:
  • Pre-pressing your fabric
    • To prevent the ghosting shown below I pressed this mochi for 30-60 seconds at 325F
  • Securely taping down your paper with heat-resistant tape
  • If using an easy press, do not let the press slide when you press down
Picture
My colors are so different from what I designed on my computer!

​Have you pressed your design yet? The colors can look very different printed before they are pressed onto the fabric, which is when the true colors come out.

If you have pressed your fabric, it could be due to ICC profile difference (read section above). You may need to change your colors to get the one you want on your fabric. You can either print out small squares of color similar to the color you want, or, try printing a test guide like this one Kaerura found and applying it to your fabric at the desired time and temperature (click on image for a link to full size). It's very important to use the same settings for your tests as you intend to use on your final, because the time pressed can change colors significantly too. Some very subtle differences in colors may get lost in the sublimation process. For example, see how the gradients turned out when pressed in my Trial & Error section above.
Picture

If you found this guide helpful, consider buying me a ko-fi! Thank you!
  • Home
  • Portfolio
  • FAQ
  • Guides
    • Tutorials
    • Mochi minky
    • Sublimation
    • Plush Making Resources
  • About
    • The Artist
    • The Mascot
  • Contact
  • Shop
  • Patreon