 The character I was making, Leo, had a big faux fur mane that contained several swirls in it. Here's how I made them! For this method you'll need:
The gist of the technique is to make "cinnamon rolls" from faux fur. But if you simply cut a strip of fur and swirl it up, you'll have a raw edge on the inside, and if you're using a long pile faux fur, the swirl will be masked by the length of the fur. I was using a 2-3 inches long faux fur for the mane and the swirls needed to be made from the same fabric to match. The first step is to cut out strips of faux fur. Each strip will be 1 swirl. The width will be however wide you want the swirl to be plus 3/8"-1/2" extra on each side, as we'll be finishing the edges. The length will depend on how big you want the swirl. The fabric for my swirls varied from 8"-12" long.
Now you need to shave down the fur to help define the swirl. You need to use clippers that are dedicated to faux fur (and not ones you also use on your pet!) I bought a basic one off Amazon. If you plan on shaving a lot of fur, you probably want to invest in a good one.
The fur was still too long for the swirls, so I removed the guard and shaved it down even further.  The fur was still too long, but at this point i preferred to finish the edges and then shave it further as needed. We're going to glue the raw edges to the wrong side of the fabric to finish the edge. This is important because the edge of the faux fur is what forms the swirl. If the edge is raw, not only will you not get a swirl effect but it will not be attractive either. Why glue instead of sewing? Sewing two pieces of faux fur together and flipping it right side out makes it bulky, which doesn't work very well for this size of swirl. Even if you were to top stitch two pieces together with wrong sides together, you would still have a raw edge on the sides. I'm not a fan of using glue in my plushies and I try to avoid it at all costs. From my experience making cosplays I found that glue let me down virtually every time I used it and it didn't last as long as stitching. But using hot glue on faux fur is pretty standard in fursuit making and other projects involving it. If you have another type of glue you prefer, you can use that instead, but it might be harder to form the swirls with a glue that doesn't solidify as quickly as hot glue.  Put a strip of glue right along the edge of the fur. I left about an inch at the top of the strip because I would be machine sewing the strips into the mane before swirling them into shape. This prevents some hand sewing in the future, which I also really don't like doing!  Immediately fold the edge over so it lands right in the middle of the strip. Be careful not to burn yourself.  Repeat the process with the other side. Check the edges and if any are still lifting up, apply more glue and stick it back down. I do not finish the top or bottom of the strip.
Now I sewed the strips into the mane of my plush where i wanted the swirls to start. I did NOT swirl them yet because it would be much more awkward to sew with them swirled. When you're ready to swirl them, warm up your glue gun. If you are swirling the fur on the plush like I am you may want to cover the rest of it with a towel to protect it from any drips of hot glue like I am.  Apply hot glue on the WRONG side of the swirl (where you see the raw edges). You can see how high up you need to put the glue by rolling it up without any glue, seeing how far up the fur touches itself, and then applying glue up to that point.  Quickly roll up the swirl. Tuck the end of the roll and begin to roll it up, trying to keep the fur nice and tidy. Hold it in place until the glue dries.  Once the glue dries you can let go and see how it holds. I didn't want the swirl to start this low, so I added more glue above it and rolled it up some more.  If you're happy with how your swirl looks you can stop there. If you'd like to add more definition you can use a fabric marker or air brush to further define the edges of the swirl. I didn't feel like busting out my airbrush so I just used a fabric marker. You'll want to use a darker color that will complement your fur.  By coloring inside the edges of the fur you can further bring out the shape. I stuck my marker inside of the swirl (but not too deep) and lightly colored to bring it out. It doesn't take a lot!
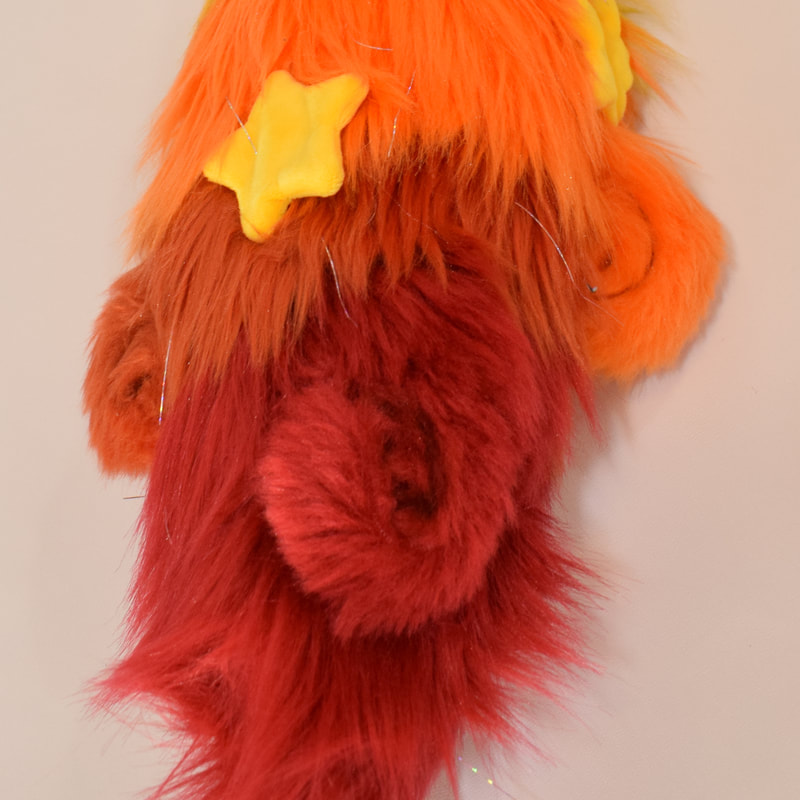
Here is the same swirl before and after applying the marker to define the shape. It makes a nice difference!
1 Comment
Grey
4/12/2022 02:45:55 am
Wow! Thank you so much for this tutorial, ive been trying for a long time to figure out a way to make swirls in fur and never thought of this method! This is gonna help a tone when i make my next plush and when i make my main fursuit head's curly mane. Leave a Reply. |
Archives
December 2022
Categories
All
|


 RSS Feed