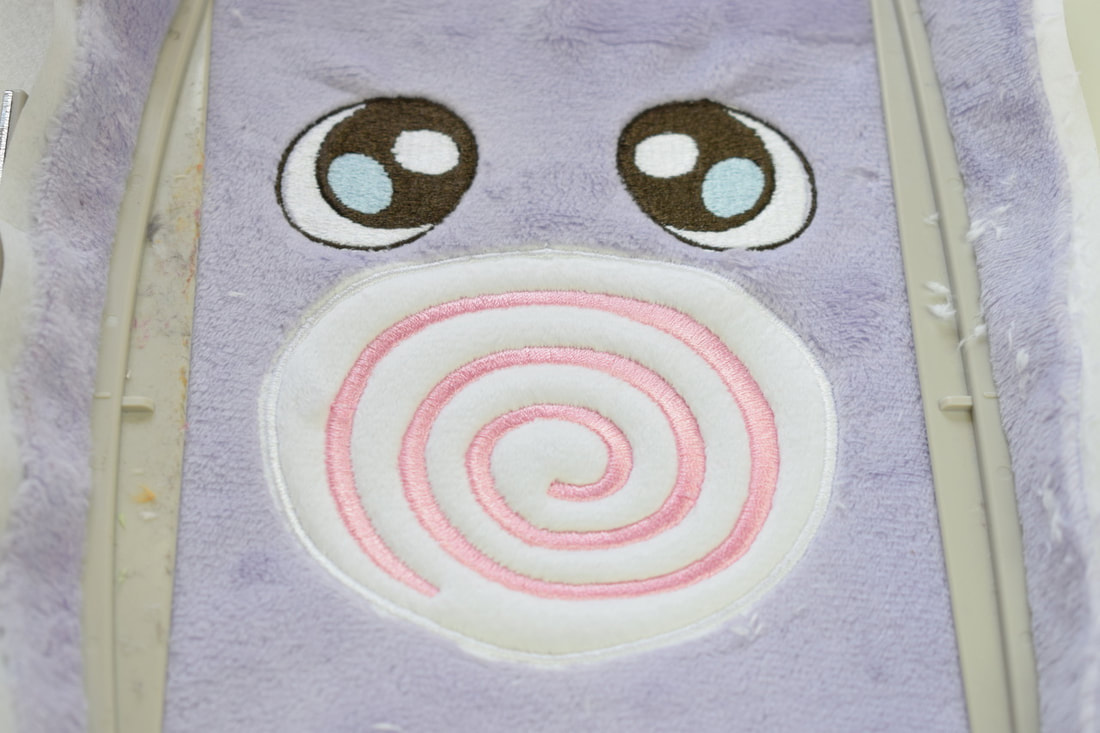
 Applique is when you take one piece of fabric and attach it to another piece of fabric by satin stitching (tight zigzag stitches). This can look more professional than top-stitching and makes it easier to add complex designs to your piece. Applique can be done two ways - what I call “by hand” (still sewn with a sewing machine, but not programmed with an embroidery program) or with an embroidery machine (with the stitches sewn by an embroidery program). This tutorial will go over the latter method. Each method has its pros and cons: by hand takes less up-front work, but tends to be messier depending on the skill level of the maker; by machine takes a decent amount of prep up-front, but is very clean and isn’t dependent on the skill of the maker. I generally prefer the embroidery machine method, unless it is a very small piece on a part of the plush that is not a “focus point”.  I wanted Poliwag’s white belly piece to be applique. It is a very large part of the plush, and if I made the white part embroidery, it would be rough to the touch and take a ton of stitches. It would likely also warp the shape of the plush since it’s a big, rounded piece of embroidery. The first step is to design the applique in your embroidery program. I can only speak to Embird. Use the “Create applique object” button (5th from the bottom on the left) and trace the outline of your applique object. Embird automatically will program two basting stitches and the satin stitch if you use this feature. All you have to do is draw the shape. Adjust the parameters of the piece as necessary (I usually make the stitches a little more dense and up the pull compensation a tiny bit). I will not go over the creation of the eyes in this tutorial since they are embroidery and not applique.  Once you’re done, print out your design with your centering icon and trace your pattern over it. Cut it out. Cut out a piece of minky larger than your pattern. Do not cut out your pattern piece. You want this piece to be bigger so you have some margin for error in placement of your embroidery here. Mark the center of the applique, NOT the pattern (these two happen to be the same on this design, but that’s not always the case) on the piece of fabric with a water soluble fabric pen.  Cut out a piece of stabilizer for your embroidery hoop. At the time I did this tutorial, I only had a 4"4" embroidery space. My design goes over 4″x4″, so I used a 4″x7″ hoop. I measure by placing the hoop on the stabilizer and cutting about 1″ past each edge.  Spray the stabilizer with adhesive spray. Make sure the adhesive is for sewing/embroidery. I keep a piece of cardboard handy for spraying stabilizer. Do NOT spray the fabric - it makes it extremely sticky and nasty.  Place your fabric on the stabilizer. Make sure the nap is going the right way (depends on how your design lays in the hoop). For now, we are not going to put water soluble stabilizer on top. We will later!  Hoop your fabric. Use the placement guide your hoop came with as needed. I didn't mark the center on my fabric, but I highly recommend doing this.  Hook the hoop onto your machine. Since I’m using the larger hoop, there are 3 different positions you can hook it onto the machine. Be aware of which section your embroidery belongs in, depending on your design. You don’t want to mess this up!  When you load your design into the machine, you’ll see several different segments. The first couple are basting stitches. Stitch the first segment. It will stop automatically.  It will outline your applique piece with some long stitches. We will use this as a guide to place our applique fabric. Cut out a piece of fabric for your applique slightly larger than your final applique piece. The bigger it is, the less chance of error, but the more fabric wasted.  Place the fabric over the basting stitches.  Let the second segment run. It will stitch the applique piece in place.  Now you need to trim the edges as close as possible to the stitching. I use curved embroidery scissors for this.  Finally, put water soluble stabilizer on top. Since we didn’t hoop it with the fabric, I usually pin it in place. But be careful, since they can get stitched over! Try to put them way out of the way. The final segment will do the satin stitching around the white part. After it’s done, do any further embroidery as necessary. When you’re finished, remove the stabilizer from the top and bottom of the piece. If there is any extra fabric sticking out from the satin stitching, clean it up the best you can. Then you’re all done!
If you'd like to see more tutorials or have a request for one in particular, let me know!
2 Comments
Deborah
4/12/2021 10:29:22 am
This is amazing! I just watched your video about it, too. Can I buy the embroidery design from you? If so, where or how? Thanks much for the fantastic instructions! 6/10/2023 02:49:49 pm
Embird automatically will program two basting stitches and the satin stitch if you use this feature. Thank you for making this such an awesome post! Leave a Reply. |
Archives
December 2022
Categories
All
|
 RSS Feed