PLUSH BY MAKESHIFTWINGS
  • Home
  • Portfolio
  • FAQ
  • Guides
    • Tutorials
    • Mochi minky
    • Sublimation
    • Plush Making Resources
  • About
    • The Artist
    • The Mascot
  • Contact
  • Shop
  • Patreon

Plush Making Tutorial - Paper Towel Patterning

8/31/2020

0 Comments

 
Picture
“Paper towel patterning, where have you been all my life?” I’ve been asking myself while working on my current plush. I’ve seen people do it but never have tried it myself. But now I have and boy, am I glad I did! So here I am to try and encourage you all to join the club.

Using paper towels to pattern is great for draping clothes, hair, or any other flowy things on a plush you have in your hands. It would not be good for patterning bodies from scratch. You can easily cut it, draw on it, add extra pieces to it, etc. Paper towels will act more like fabric than normal paper would! I use Viva paper towels. They are a bit more cloth-like than most paper towels, but any should work; they just might not lay quite as nicely.

Pull up a reference photo of what you’re making. I’m going to make this dress/jacket (“dracket”). You will want to make any pieces under the article you’re patterning first. So I’ve already made her shirt and pants.
Picture
What we pattern will be WITHOUT seam allowance, so pattern exactly how you want the piece to fall. I’m going to start with the front left side of her jacket. Tear off a section of towel and pin it in place.
​
Her jacket ends at just about the middle of the right collar, so I folded the towel and pinned it in place.
Picture
I cut a little bit of towel right above her shoulder to start a sleeve (or, lack of one in this case). Instead of cutting all the way I folded the towel to make the shape I wanted just in case I cut too far; it’s easier to remove towel rather than add! After that I could just tuck the rest of it around her side to get it form fitting.
​
Her dracket has a V-neck, so I drew it with fabric pen. Then I cut it out. Make sure you use different scissors than the ones you use for fabric to preserve your nice scissors!
Picture
I added the right section underneath the left one. I like that the paper towel is sheer enough that I can see how much overlap I have between the two layers, which you want since they’ll be buttoned together. I followed the same process of cutting a line above her shoulder and then wrapping the towel around the back of her body.

She has a leg opening on the right side of the dracket, which I drew and then cut out. Again, err on the side of cutting less than you think you need.
​
The dracket also needed to be longer, so I cut a strip of towel and pinned it to the bottom to add length (not shown here, but you can see in the header image of this post).
Picture
Picture
Next I needed to add towel to her shoulders since the first piece of towel wasn’t long enough to reach. I cut pieces and added them to the towel with pins where needed.
I repeated the same process with the back. Since it’s symmetrical, I didn’t need to do the entire back; in fact, you likely DON’T want to do that since you can end up with an uneven pattern. I lined up the edge of the paper towel along her back exactly where the seam/ middle would be. You can just pin the other side of the towel to the front side where it overlaps. The edges of the towel don’t matter for the most part (unless you’ve strategically placed them like I did with the back). You just want all the towel to lie flat.
Picture
​Continue to pattern all your pieces and make patches of paper towel as necessary, pinning everything in place.
​
Once you have the whole thing draped and patterned, you need to draw the seams. For standard clothes you want a seam along the shoulders and the sides. For the back, you can lay the middle back seam along a fold of fabric to get it perfectly symmetrical instead of having a seam. I drew where the seams should be with my fabric pen directly on the paper towel. You can see that I’ve drawn over many layers of towel, ones that started on the back, front, patches of towel, etc. Again these layers don’t really matter, but you want to make sure that your layers will stick together when you cut along the seam line, so you likely will need to add some extra pins along the line you drew. You don’t want your pattern to fall apart after you cut it!
Picture
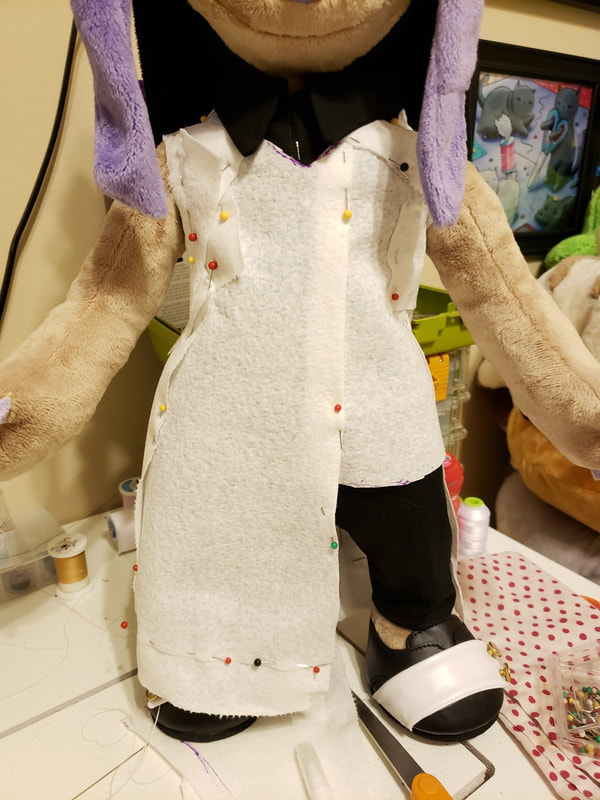
You can also add darts to your clothes if needed by folding the towel, pinning it in place, and then drawing along where the seam would be, but I didn’t need to since it’s a flowy piece.
Picture
Once you’ve drawn all your seams and pinned the towels together securely, carefully cut your pattern along the seams. Use a crappy pair of scissors that won’t cut through the fabric or plush underneath it (you should be using a crappy pair anyway, since nice scissors should be reserved only for fabric). I’m serious, be super super careful and if you feel any more resistance than you think you should, stop and make sure you’re not cutting into anything you don’t want to! If you notice your pattern coming apart, stop and pin where you need to. As you pull the pattern off your plush, you probably have pinned through the fabric beneath it so gently remove the pin and replace it.
​
Now you will have all your pattern pieces in paper towel form! But, this isn’t sturdy at all, especially with pins holding it together. If you’re anything like me your pattern pieces go through hell and back. Trace your pattern piece onto your REAL patterning material of choice (I just use normal printer paper). Make up for any minor rough parts/inconsistencies (you can see I corrected the rough edge around the armpit). Add seam allowance if that’s how you roll with your patterns. I use 0.25″ and just eyeball it, but you can certainly be precise with a ruler. Mark what piece they are and what side of the fabric it is as necessary.
Picture
Repeat with all your pattern pieces. For the back, you can see I just mirrored the pattern I made by folding the paper and tracing the pattern along the edge (this isn’t really necessary either, since I’m going to end up just folding it in half and placing it on the fabric that way, but whatever). Now you have a nice pattern that should fit your plush just perfectly! Hooray!

If you'd like to see more tutorials or have a request for one in particular, let me know!​
0 Comments


Leave a Reply.

    Archives

    December 2022
    September 2022
    July 2022
    June 2022
    May 2022
    April 2022
    February 2022
    January 2022
    December 2021
    October 2021
    September 2021
    August 2021
    July 2021
    June 2021
    May 2021
    April 2021
    March 2021
    February 2021
    January 2021
    December 2020
    November 2020
    October 2020
    September 2020
    August 2020

    Categories

    All
    Advanced
    Applique
    Beginner
    Business
    Clothing
    Dyeing
    Ears
    Embroidery
    Faux Fur
    Hair
    Materials
    Mochi
    Patterning
    Plush Writeups
    Scent
    Sublimation
    Timelapse
    Tutorials

    RSS Feed

  • Home
  • Portfolio
  • FAQ
  • Guides
    • Tutorials
    • Mochi minky
    • Sublimation
    • Plush Making Resources
  • About
    • The Artist
    • The Mascot
  • Contact
  • Shop
  • Patreon