 How could I resist making this adorable boy? I love Tidbit's design and his outfit seemed like a nice challenge! His body was simple and straightforward, which made for a good first project of this commission round.  Tidbit's owner requested my short legged, large tummy pattern. His body underneath the outfit was all cream, so no alterations to my body pattern were warranted. Very straightforward!
Of course Tidbit gets puffy paw pads too!  The body came together quickly without issues. I did remake his feet once to make them larger. I needed to balance being able to fit them in Build A Bear shoes while keeping them proportional to the body. So they take a bit of squeezing to fit in, but work for both purposes!
Shifty having fun with Tidbit's body! It was important to me to keep Tidbit's cute small nose in his head pattern. This required an entirely new head pattern. I typically pattern plushies smaller than my actual plush to save materials, and then scale it up when I'm done. This patterning process was not pretty! The first try was absolutely hideous. The top and bottom were caving in on each other, there was no real muzzle definition, and it was totally flat. This is pretty common for my first try head patterns.
The second revision was not much better, although the head wasn't caving in as much anymore.
Now we had more muzzle definition and the sides of the head were better. But I didn't think the forehead gusset was adding much, so I decided to remove it. This would help sell the cute button-nose, simple style of the character.
Getting there! The muzzle is defined but not too big, but I didn't like how the bottom of the muzzle was pinching inward. This required adding some gussets at the bottom.
I liked the general shape of the front of the head, but the back of the head wasn't rounded enough. Everything needed some more minor adjustments.
Now the head was too wide! It needed to be taken in more. But I was confident enough in the further small revisions to take the next text to scale with my plush and try out the embroidery.  Tidbit has hazel eyes. Since the colors are different, I thought a gradient would look nice. I'm not very good at gradients, so I did a ton of tests to get something I liked.  After a while, I got some test eyes that I liked! Time to embroider them onto the test head pattern. 
Overall, I was happy with the test head! The eyebrows needed to be repositioned but it was an easy fix. Onto the actual head!
Head pinned onto the body! I needed to pattern the hat before finalizing Tidbit's body. His hat is large and tilts back at an angle behind his ears, which meant that it would not sit on his head without support. I wanted to use fishing lure since you can't really see it, but I wasn't confident that I could get it to hold. I might need to use magnets. If I did, I didn't want to finish the body and stuff it and then discover I'd need to add magnets which would require undoing all of that work.
I patterned the hat first, got the shape and angle right, and then sewed in some fishing lure. It worked just fine!  I ended up patterning his tail last for some reason. I decided to add a cute curl at the end. Having it touch the ground also helps him stand up on his own. With his head and tail finished, I could sew him together!  Tidbit FLOP! His main outfit is a onesie. I decided to use the paper towel patterning method because I really didn't know how to freehand this, considering his body shape.  Paper towl chic! After draping the paper towels, I drew on the seams, cut it apart for the pattern, and made a test onesie out of muslin. The large sleeves took a few tries to get right. Tidbit's owner wanted the clothes removable, so the onesie has an invisible zipper running up the back. Besides some pom-poms that were too large, his test onesie was looking good, and his shoes looked cute with the outfit too! But they needed some paint.
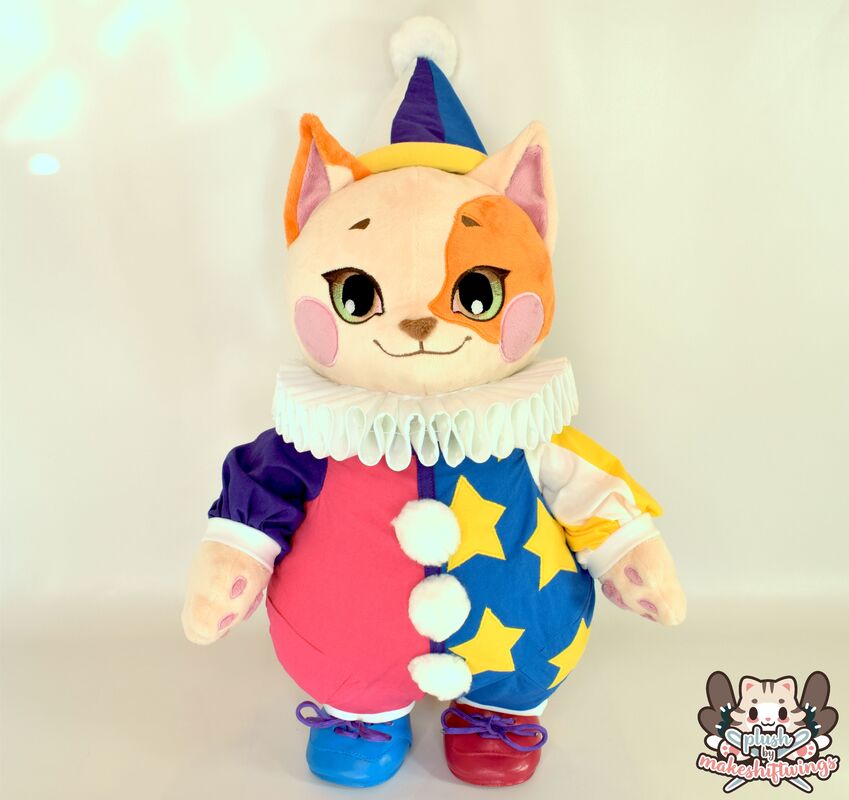
The stars were done with applique. Since I used simple cotton, I had to do a couple layers of yellow so it wasn't transparent. I also had to heat n' bond the layers together before doing the applique. I did one without, and it was very wrinkly since the fabric shifted while being sewn down.   His one sleeve is yellow and white striped. Of course, there was no fabric remotely similar, so I just made the stripes myself by sewing strips of fabric together.  There is a bunch of purple trim on Tidbit's outfit. For the ones running down the middle of the outfit, I made simple strips. The back seam is split to have the zipper, so I had to make two very narrow srips that would equal the total desired width once zipped up. If I just used the larger trim and put it to one side, it would be off-center. I made double-sided bias tape for the trim on the neckline and around the tail hole. It's been years since I've made bias tape! Can't say I missed it.   It took a few days, but his onesie came together without any major issues!  I moved onto his hat next. His hat has a thick yellow trim and I was a but lost on how to achieve this effect. If I made it from normal cotton and stuffed it with polyfil, it would be lumpy. I could not think of any trim or anything similar to use. I asked around on a plushmaking Discord I'm in, and my friend Jamie came to the rescue! There was something called cord filling that was absolutely perfect. Here it is wrapped around the test hat. It gets inserted into the fabric tube that forms the brim.  I went ahead and made a cotton tube to stuff with the cord, but it was still wrinkly because it's a non-stretch fabric. Luckily, I had leftover yellow knit from my old Toph cosplay that was very close in color! One of the few times when my fabric hoarding is validated.  Tidbit's shoes are Build A Bear, but needed to be painted pink and blue. I found multi-surface acrylic paint that were very close to his clothes. I applied many thin layers to the shoes. The pink required about double the blue. For the shoelaces I ordered a pack of different colored parachute cord. I decided to use purple as the shoelaces in his reference sheet were not well defined, and I thought the purple shoelaces helped pull his whole outfit together!  I was a bit intimated by his ruff collar, but luckily there were a lot of helpful tutorials online. Once again my fabric hoarding came in handy as it required horsehair braiding to define its shape and I had a bunch of it on hand. It had two main parts: a folded piece of fabric that ended up being around 8 feet long, which has two rows of long hand stitches. You pull the stitches tight to form the rolls. Once you make the length of the ruff, you hand sew on a backing piece to hide the raw edge of the rolls. The process was fascinating!  With his ruff finished, he was done! The collar was really the piece that tied everything together!  I think he came out super cute! You can watch a timelapse of sewing him here! And an image gallery below!
0 Comments
Leave a Reply. |
Archives
December 2022
Categories
All
|


 RSS Feed