I first saw this character last year and I've always wanted to make him. I just love his adorable design! I'm glad that the official request for the commission didn't come until I started offering floppy plushies because I just love how he came out!
He was a ton of work and my first major plush to feature sublimation (basically dyeing minky); I hope you enjoy the process of making him! 
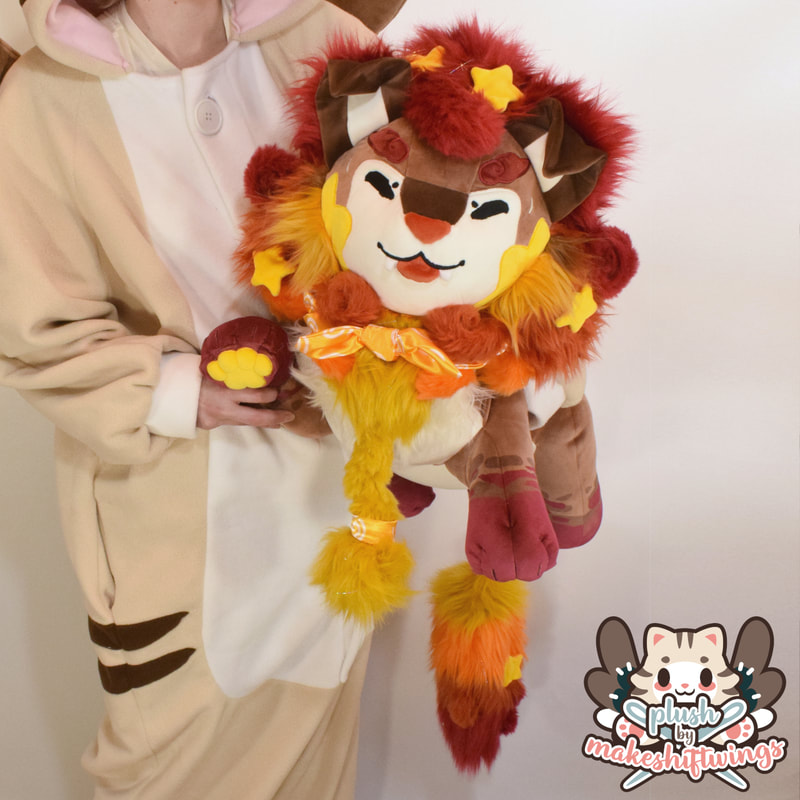
Leo is super fluffy with a sparkly mane! He is a sushi dog which is a closed species.
My client asked for him to be made entirely from mochi minky with a faux fur mane. With my new obsession with mochi I was happy to do so! He would also be the large version of my floppy pattern. 
The previous plush I made with my floppy pattern, Aki, was a long boy so the body needed to be shortened and widened. My first test was alright but the arms were too long.

The second test was more in proportion!
Patterning in mochi is an.. experience, lol. I knew I'd have to adjust my head pattern because of the stretch of the fabric (which believe it or not I had done before this test), but the adjustment needed to be much more severe.
To help fight the stretch of the mochi on a pattern that needed to be structured like a head, I applied fusible interfacing to the wrong side to keep it from stretching too much.
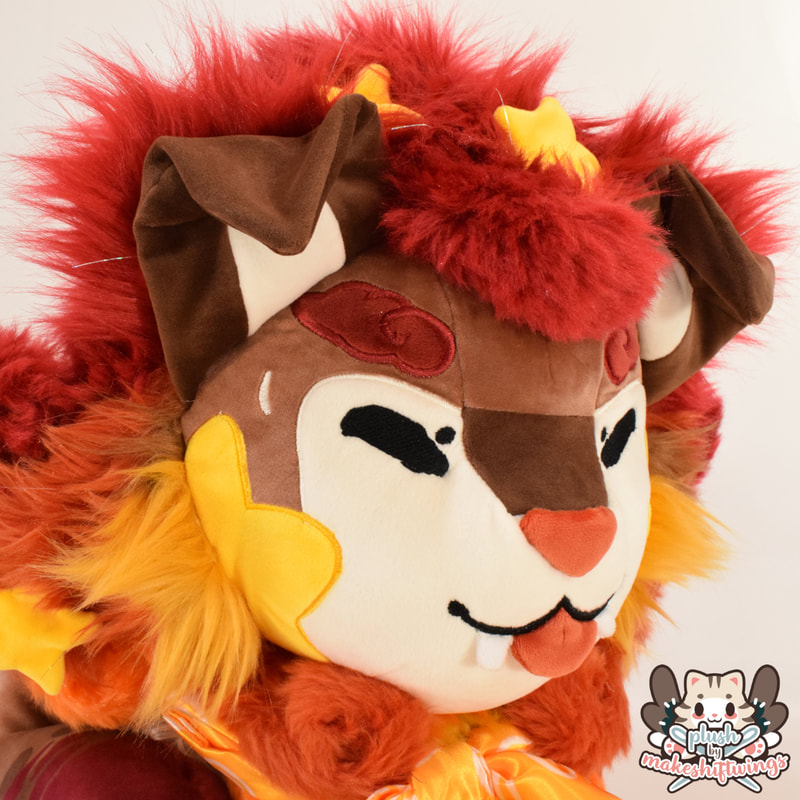
After more adjustments his head was looking less blob-y and much cuter!
The ears were sewn into a floppy position using darts. I have a tutorial for that here. Now.. to figure out that insane mane. To pattern it, I added extra volume to the back of the head. Normally this would just look VERY strange on a minky plush, like the back of the head is too big, but with faux fur it gives a mane effect. To make the "spikes", I patterned cones into the pattern pieces that formed the back of the head. These were just simple 2D triangles with the faux fur itself adding the volume to not make them appear so plain. By sectioning them off and running the faux fur in the direction of the point it helps define the spikes. This made the pattern pretty confusing where I had to stare at it forever to figure out what went where, even with markings ?
For this small test plush the faux fur was too long and made the mane look too big, but this wouldn't be an issue once the pattern was scaled up and matched the length of the faux fur.
The way the faux fur mane pulled at the mochi of the face needed to be compensated for as well.
I knew to make the swirls I'd use a "cinnamon roll" technique. I first experimented with brushing out the wrong side of faux fur but the edges were still raw which meant the swirls wouldn't look good. I ended finishing the edges by gluing them. I walked through the whole process of making the swirls here.
I wanted to do one more mane test. I wanted more volume towards the top of the head, to further test the mane around his chin, and also to make sure the gradient in the mane looked alright. Even though again it was too big for this little plush, I was sure it would look okay in the big plush.

Around this time I decided to invest in an at-home sublimation setup. Sublimation is the process of printing a design with dye onto paper and transferring it to fabric via heat press. (I have an entire guide on the process here).
Leo's markings around his feet and tail are complex. While it could be done with applique, applique limits the stretch of mochi. It also results in a "wrapped roast" appearance when stuffed, as the stripes will not stretch after applique but the space between them will. By doing sublimation it entirely preserves the stretch of mochi!
While sublimation is most commonly done on white fabric, with an at-home setup you can do it on whatever color minky you want! So I could do sublimation on the light brown I was using for his body. I was able to match the original color of pink I was going to use for the paws (which wasn't even a mochi, but had to be 1.5mm minky due to color availability) and also the brown used for his ears and nose bridge. This way I wouldn't have to sublimate extra minky to match and I could just use the mochi I was going to use originally.

The sublimation was done first, as I needed to applique the stripes onto the back since you can't sublimate white (you have to dye white minky darker, and that would be way too much for this project, and my tools can't do that big of a space.)

Applique on top of the sublimation! I like that layering it on top of sublimation doesn't add extra bulk.
Leo also got mochi paw pads! I sublimated the fabric underneath to match the paws.

Leo got a 3D blep and fangs, and some sparkly eyebrows! I used the same glitter spray as I'd use for the mane and tail (more on that below).

This is all the fur for Leo's mane and tail, not including the swirls! Since it was glittery, I used the glitter spray linked above. At first I tried this craft spray which I chose because it was less spray-painty and wouldn't clump the fur as much. But it shed like crazy to the touch. So I moved to the Krylon which didn't shed as much and still gave a nice sparkle effect. It clumped the fur but you could brush it out afterward. I did 3 sprays of the glitter.
It still shed, though, and because this was a plush made for cuddling I wanted the shed to be minimal. So I sealed it with Krylon Kamar Varnish which is one of the recommended ways on the bottle. It also needed to be brushed out after. All the brushing caused the glitter to continue to shed, and of course this also means less glitter is on the faux fur. So I literally vacuumed up the remains! Overall the glitter effect is not as prominent as straight out of the bottle; if you were making a piece purely for display, you could probably get away with just using the Krylon glitter spray, brushing it out, and calling it a day.
To help supplement the glitter I sewed tinsel into the mane and tail! I used a needle to thread it through from the back and attached it to the wrong side of the fur with hot glue.
Time to sew this baby together! 
Body!

Face!

Tail, pre-tinsel!
Once I got the body and head sewn together, I stuffed them separately and pinned everything together to make sure placement looks good! I was pretty concerned about the head drooping a bit due to how soft mochi fabric and stuffing is in combination with a big heavy head mostly made from faux fur, but it worked out in the end!

Leo FLOP!
The tendrils were the faux fur before they were swirled into shape. Minimizing hand sewing!
OH LORD i did not expect him to be as heavy as he was! I put a big bean bag in his butt to counter balance the heavy head and he also has beans in his paws. He's basically a weighted blanket plush!

The sublimation markings on his back paws

The last details were a scarf that I made from custom printed Spoonflower satin and some stars that would get sewn into his mane and tail.
With that, he was done! Check him out in action below!
1 Comment
AniRoseArt
1/4/2022 01:59:44 pm
Man! It's amazing seeing the process and your write up! Amazing work! Leave a Reply. |
Archives
December 2022
Categories
All
|


 RSS Feed